How to Build Your First Aerial Hoop Flow: Choreography Step-by-Step
There's a moment in every aerialist's training where the individual poses stop being the goal. You can sit, tuck, drape, and invert. You know your shapes. And then your instructor — or your own ambition — asks the question: can you put them together?
That question is the difference between an aerialist and a performer. A flow is what happens when shapes stop being a checklist and become a sentence. A choreography is what happens when sentences start to tell a story.
This article walks you through how to build your first aerial hoop flow from a blank page. It's written for students who already have ten to fifteen poses solid, who can move between two of them without thinking, and who are ready to design a sequence that's actually their own. By the end, you'll have a method you can repeat for every routine you build for the rest of your training.
What "flow" actually means
The word gets thrown around carelessly. Let's define it.
A flow is a sequence of two or more aerial positions connected by intentional transitions, where the transitions look at least as deliberate as the positions themselves. A flow is not a list of poses you happen to do in a row. It's a list of poses you've chosen to do in a row, plus the how-you-got-from-each-to-the-next.
A choreography is a flow set to music, with a clear beginning, middle, and end, where the timing of the movements is anchored to the music's structure.
You build flows first. You build choreographies once you can build flows reliably.
Step 1 — Choose your music (or don't, yet)
There are two schools of thought, and both work.
Music first. Pick a song you love. Listen to it ten times before you touch the hoop. Map its structure: where the verse turns, where the chorus lifts, where the bridge breaks. Build the routine to match the song's emotional shape.
Movement first. Build the flow on the hoop in silence, focusing only on how the poses connect. Add music later — choosing something whose tempo and structure fit the movement you've already designed.
For a first flow, start with movement first. Music shapes choices in ways that beginners can't yet evaluate. You'll choose a melodramatic song and build a melodramatic flow because the song made you. Later, once your movement vocabulary is deeper, music-first becomes the more interesting approach.
Picking the right tempo for a first flow. 60 to 80 beats per minute. Slow enough that you can hold each pose for two breaths and execute transitions without rushing. Faster songs reward intermediate aerialists; they punish beginners.
Picking the right length. 90 seconds to 2:30. Long enough to feel like a routine, short enough that you can rehearse it from start to finish without your shoulders giving out. Cut your song down with a free audio editor if you need to.
Step 2 — Pick your poses (and ruthlessly edit them)
A first flow uses three to five poses, not ten. The temptation is to cram in everything you know. Resist it. The performers who look the best on hoop are the ones doing fewer things, more cleanly.
Here's the selection rule: every pose must be solid in your body. If you cannot hold the pose for ten seconds with calm breath and clean lines, it doesn't go in the flow. Routines collapse on the poses you weren't quite ready for. Use only your most reliable shapes.
A balanced set. A good five-pose set has:
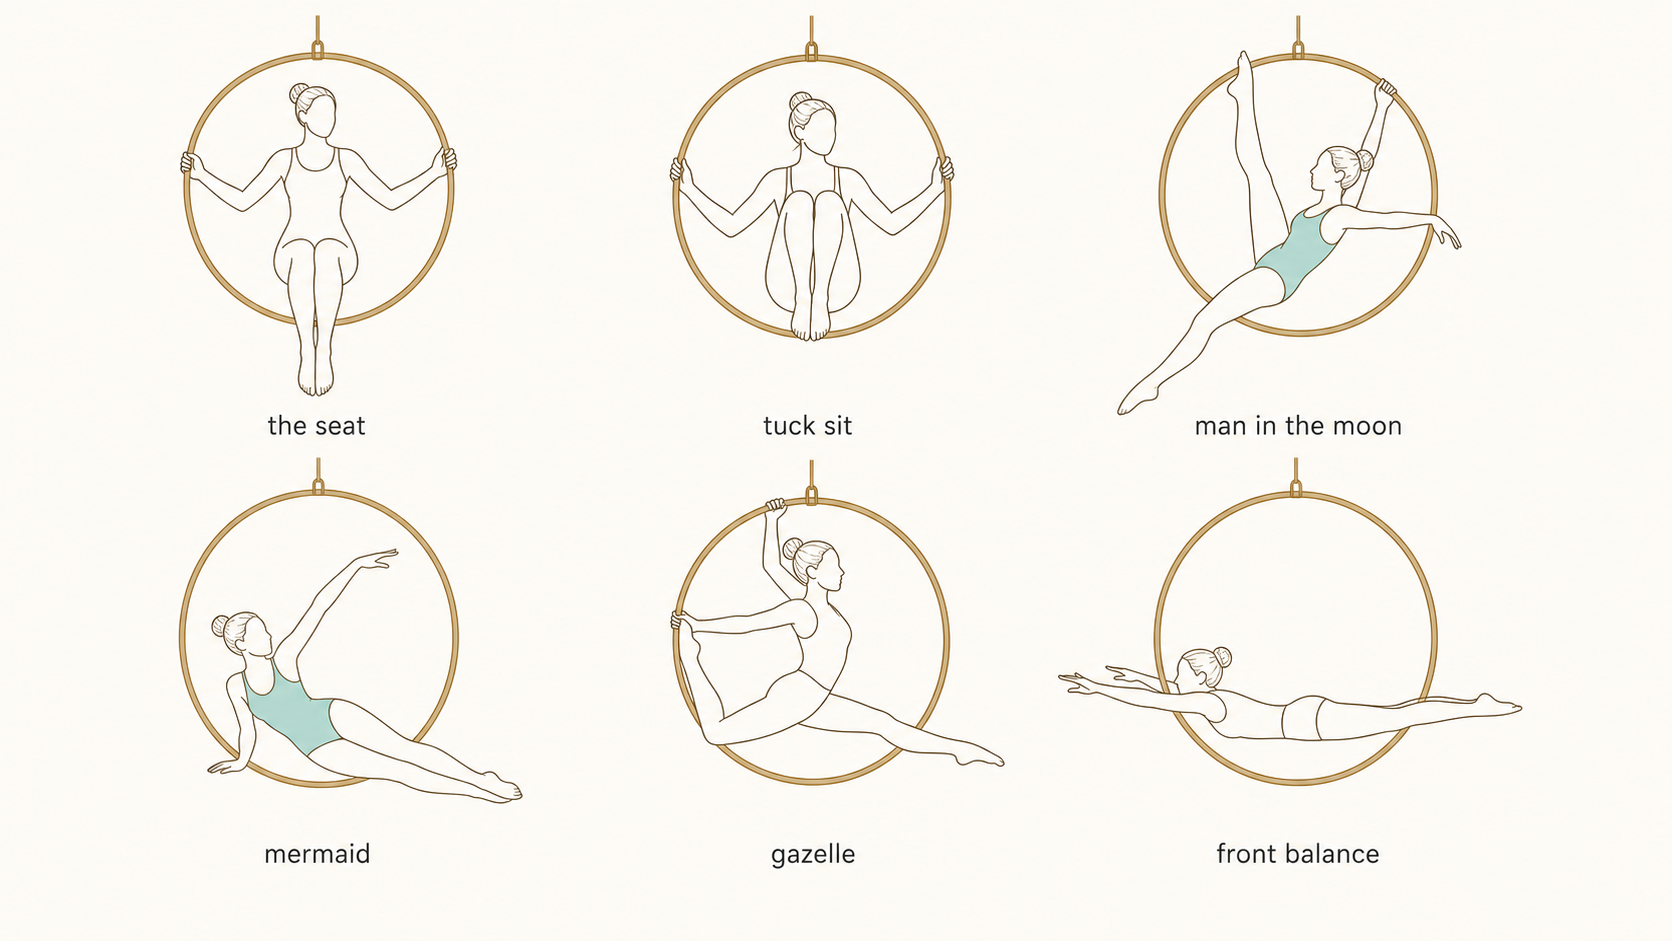
- One opening pose — usually the seat, sometimes a standing pose or low entry. Easy. Sets the visual frame.
- One photogenic pose — a Man in the Moon, a Mermaid, a Star, a Gazelle. The shape that gets photographed if someone takes a photo.
- One dynamic shape — a spin, a slow rotation, an asymmetric tilt. Something that involves motion within the pose, not just a held shape.
- One inverted pose — a knee hang, a half-inverted shape, or something that flips your relationship to the floor. (Skip this if you don't yet invert reliably; substitute another photogenic pose.)
- One closing pose — a clean exit, often back to a seat or to the floor. The flow ends with intention, not because the music stopped.
That structure is a useful template. It's not law. Once you're comfortable, you'll break it.
Step 3 — Design the transitions
This is where most beginner flows fall apart, and it's also where the most growth happens. The transition is the engine of a flow. The poses are just punctuation.
A good transition does three things:
- It connects the end-shape of pose A to the start-shape of pose B without an awkward repositioning step in between.
- It looks like it was designed, not improvised.
- It happens at a tempo that matches the rest of the flow.
A bad transition is anything that requires you to climb back into the seat between every shape. If you're returning to neutral every five seconds, you don't have a flow — you have a list of poses with the same pose between each one.
Three transition principles that work:
Use the body's path of least resistance. If pose A leaves the right hip on the bar, design pose B so it picks up the hip from there. Don't unwind the body and re-wind it.
Pause inside transitions, not just inside poses. A held shape inside a transition — a brief drape, a slow rotation, a moment of stillness — is more interesting than a fast move from one named pose to another.
Match the transition's energy to the song. Soft melody — slow, sweeping transitions. Beat drop — sharp, defined movement.
For your first flow, plan transitions explicitly. Write them down. "Seat → lean right → drape into Mermaid (4 seconds) → roll the chest open → walk hands forward into Gazelle (3 seconds)." Vague intent produces vague choreography.
Step 4 — Map it to the music
Now bring the song back in. (Or, if you started with the song, this is where you align it with the movement.)
Listen to your chosen track once. On the second listen, mark every structural change: verse, chorus, bridge, drop, instrumental break. These are your landmarks.
Each pose lives between two landmarks. The opening pose runs from 0:00 to the first landmark. The photogenic pose runs from the first to the second landmark. And so on.
The transitions live across landmarks. If a chorus is going to start at 0:30, the transition into your photogenic pose should land its arrival on 0:30 — the first beat of the chorus. That alignment is what makes a routine feel "musical" instead of just "set to music."
This is the single most important difference between a good flow and a great one. Beginners hold poses for fixed counts. Better aerialists hold poses until the music tells them to move.
Step 5 — Rehearse the way you'll perform
Common rehearsal mistake: practicing each pose in isolation, never running the whole flow.
The whole flow is a different beast. Holding a Mermaid is one thing. Holding a Mermaid after a Gazelle, with seventy seconds of routine still ahead, is a much harder thing. Endurance matters. Sequencing matters. The transitions look different in context than they do in isolation.
Run the full routine three times in a row, twice a week. That's your minimum rehearsal. The first run will be sloppy, the second will be better, the third will reveal where the flow actually breaks. Note the breakdown. Adjust. Repeat.
Film yourself. Watch the playback once, take two notes (not ten), then go again. Don't critique frame by frame — that produces anxiety, not improvement.
Step 6 — Edit ruthlessly
Your first draft has too much. Almost every first draft does.
After your second or third run-through rehearsal, ask:
- Which pose is weakest? Cut it. Replace it with another reliable pose, or just have one fewer pose.
- Which transition feels rushed? Slow it down or simplify it.
- Where am I out of breath? Add a held shape there. Built-in recovery is good design.
- What am I trying to "sell" that isn't landing? Cut it. Trust the simpler version.
The flows that look effortless are the ones that have been edited four or five times. Beginners write a draft and rehearse it. Performers write a draft, cut it in half, refine it, and then rehearse it.
Step 7 — Show it to your trainer
Even if you've designed the flow alone, get a second pair of eyes before you commit to it. Your trainer will catch the things you can't see — the slightly off-axis pose, the transition where you're compensating with momentum, the photogenic shape that's photogenic at one angle and ugly at another.
This is exactly why the Aerial Hoop Flow app has a share function. You build your flow inside the app — the poses, the order, the music link — and send it to your trainer or a fellow aerialist. They open it, see exactly what you've designed, and can give you notes without needing to be in the studio with you. No more "wait, what was the second pose again?" via text message at midnight before your performance.
Externalize the design. Get feedback. Iterate.
A worked example: a 90-second beginner flow
Here's a complete first-flow design you can use as a template.
Music. A 90-second cut of a melodic, mid-tempo song around 70 BPM. Soft intro, gentle build, calm resolution.
Pose 1 (0:00–0:20) — The Seat. Calm opening. Spine long, shoulders down. Two slow breaths. Begin a slow lean to the right around 0:15 to set up the next shape.
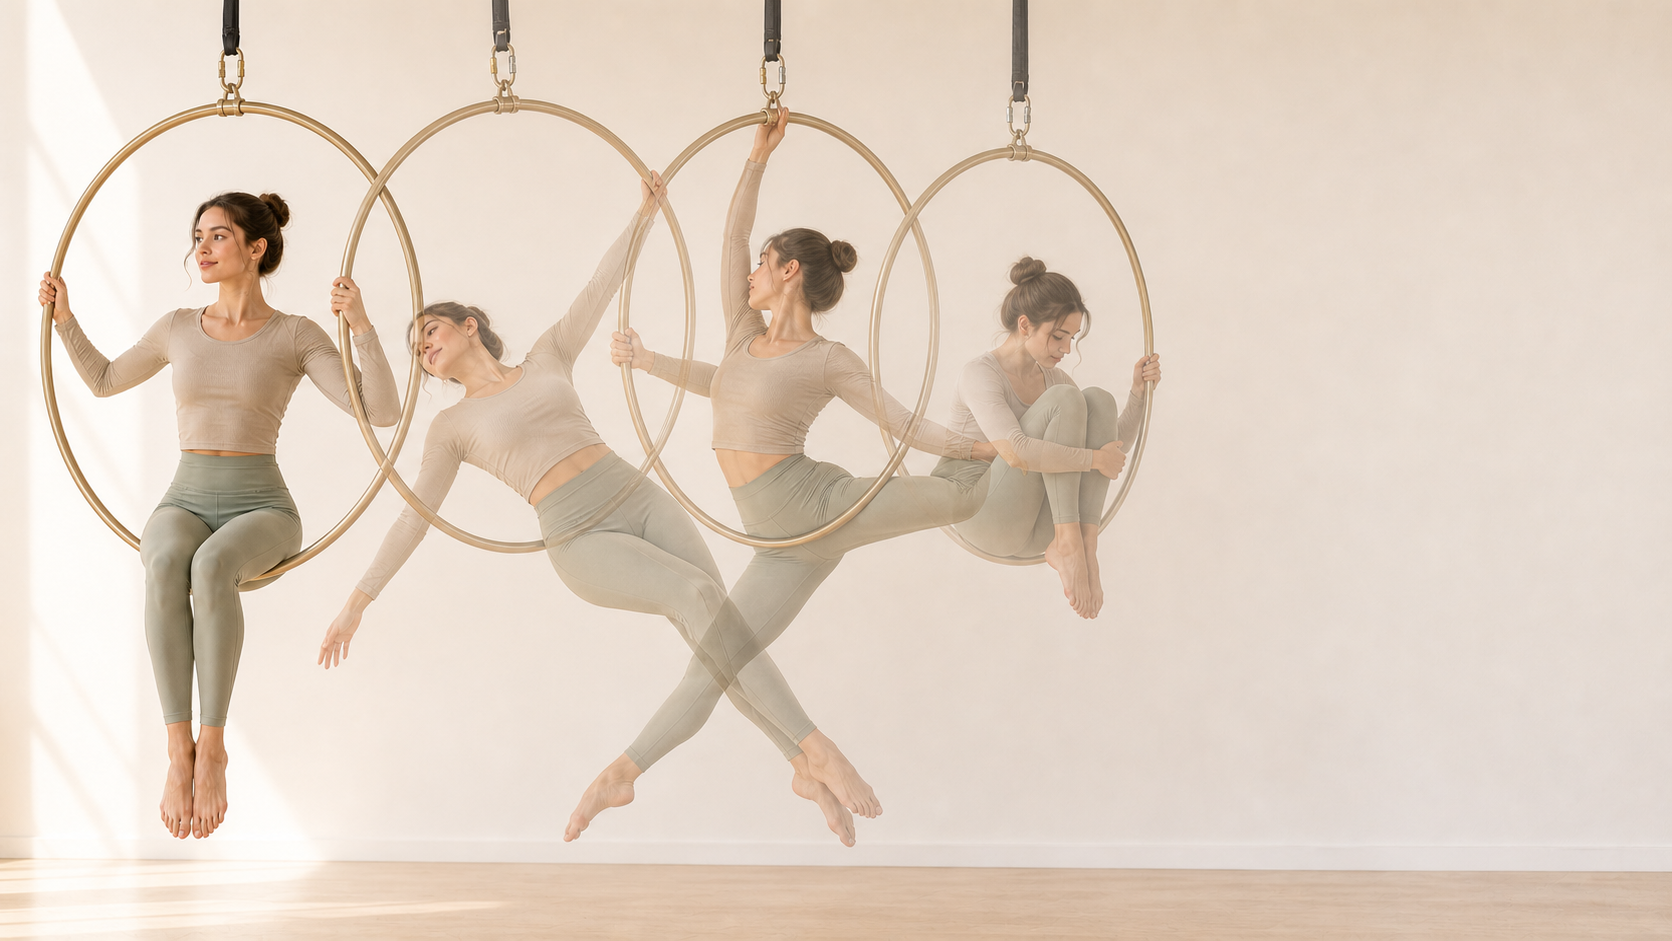
Transition 1 (0:20–0:25) — Drape into Mermaid. Lower the right side of the body across the bar. Stack the legs. Settle the propping hand.
Pose 2 (0:25–0:45) — Mermaid. Arrival on the first musical landmark (chorus or melodic lift). Hold for the duration of that musical phrase. Free arm draws a slow arc overhead.
Transition 2 (0:45–0:55) — Walk hands across the bar into Gazelle. Ten seconds of intentional movement, not five. Let the body rotate slowly through the bar.
Pose 3 (0:55–1:15) — Gazelle. Photogenic pose. Held through the second musical phrase. Toes pointed, gaze elongated.
Transition 3 (1:15–1:25) — Slow controlled rotation back through the bar to a Tuck Sit. Ten seconds.
Pose 4 (1:25–1:35) — Tuck Sit, hands released, slight backward lean. A moment of vulnerability before the close.
Closing (1:35–1:30) — Return to Seat. Hands fold into the lap. Stillness.
That's it. Four poses. Three transitions. Ninety seconds. You can perform that. Your trainer will be proud. So will you.
Once it works, iterate
A flow is never finished. You'll re-run this routine in three months and want to swap one pose. Six months from now you'll add an inversion. A year from now this flow will look like a beginner sketch and you'll wonder how it ever felt difficult. That progression is the point.
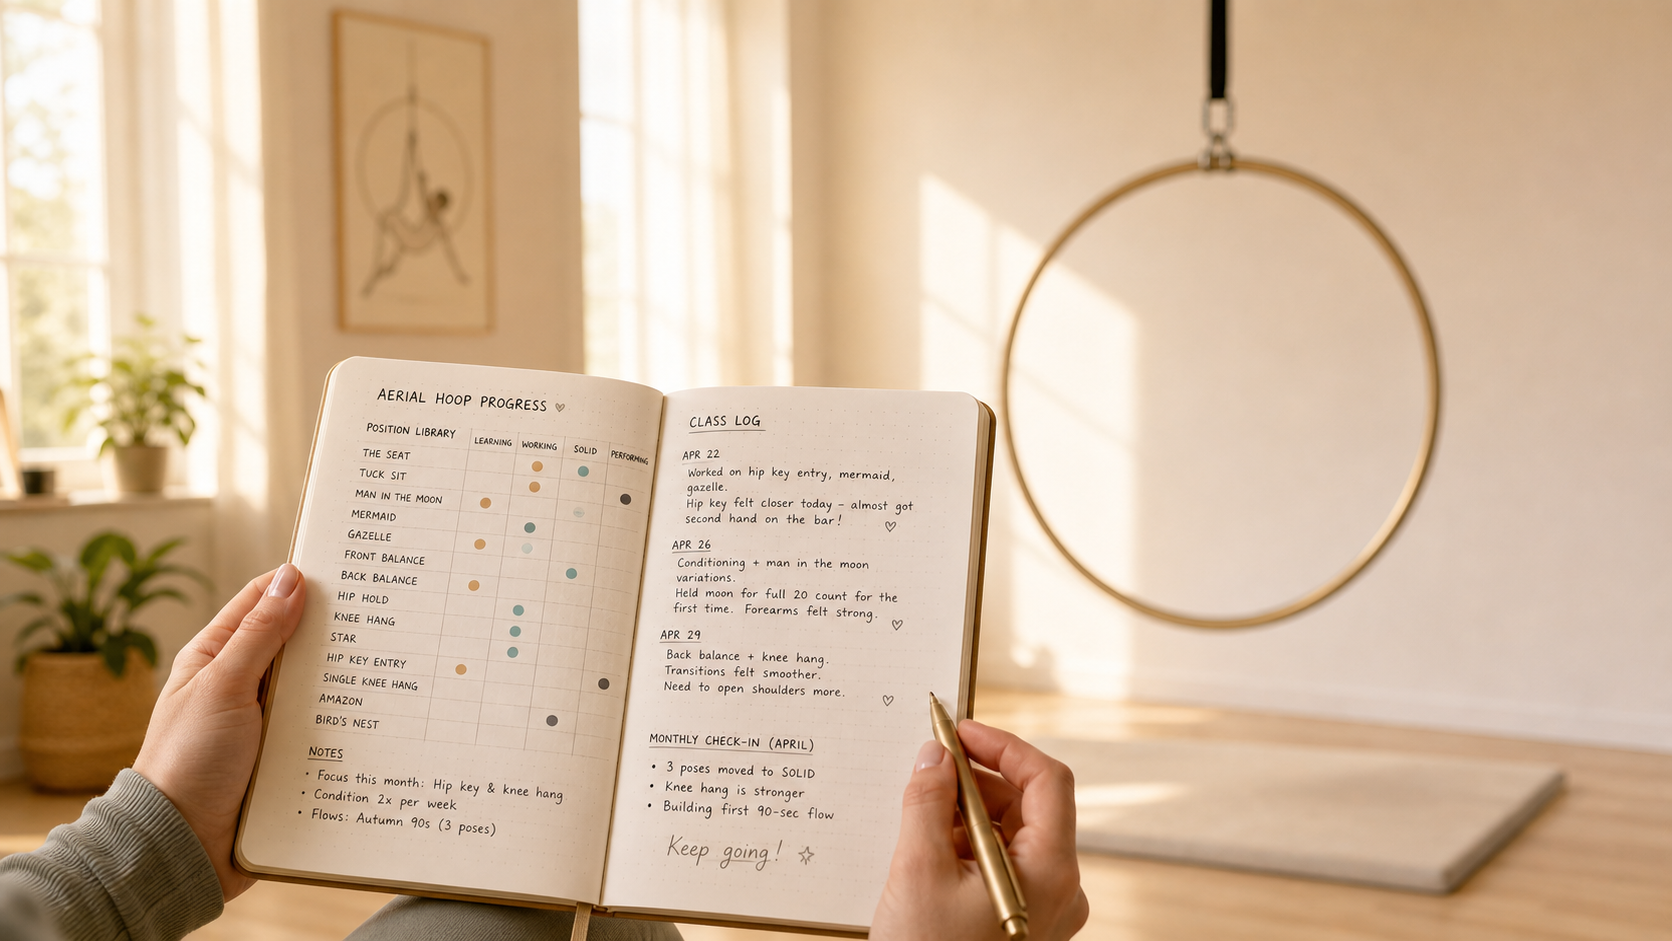
Save your flows. Track which ones you've performed, which ones you've outgrown, which ones you might revive. The library you build over years of training is one of the most valuable things in your aerial career — and it's almost always the most poorly organized.
That's the gap the Aerial Hoop Flow app was built to close: an organized library of poses, the flows you've designed, and the routines you've performed, all in one place, all shareable.
Build your first flow this month. The second one comes faster. By the fifth, you'll have a method.
Welcome to choreography.